Bareos has a graphical tool for communicating with the Bareos Director. The WebUI is multilingual and provides detailed information about backup jobs, clients, FileSets, pools, volumes, and more. It’s also possible to start backup and restore jobs via the web interface. Our new blog series gives an introduction to the Bareos WebUI. In this second episode, we focus on the modules and their functionality.
In the first part of our article series about Bareos’ graphical web interface, we gave a brief introduction to the different WebUI modules. Now it’s time to take a closer look at the Dashboard and the modules Jobs, Restore, Clients, Schedules, Storages, and Director.
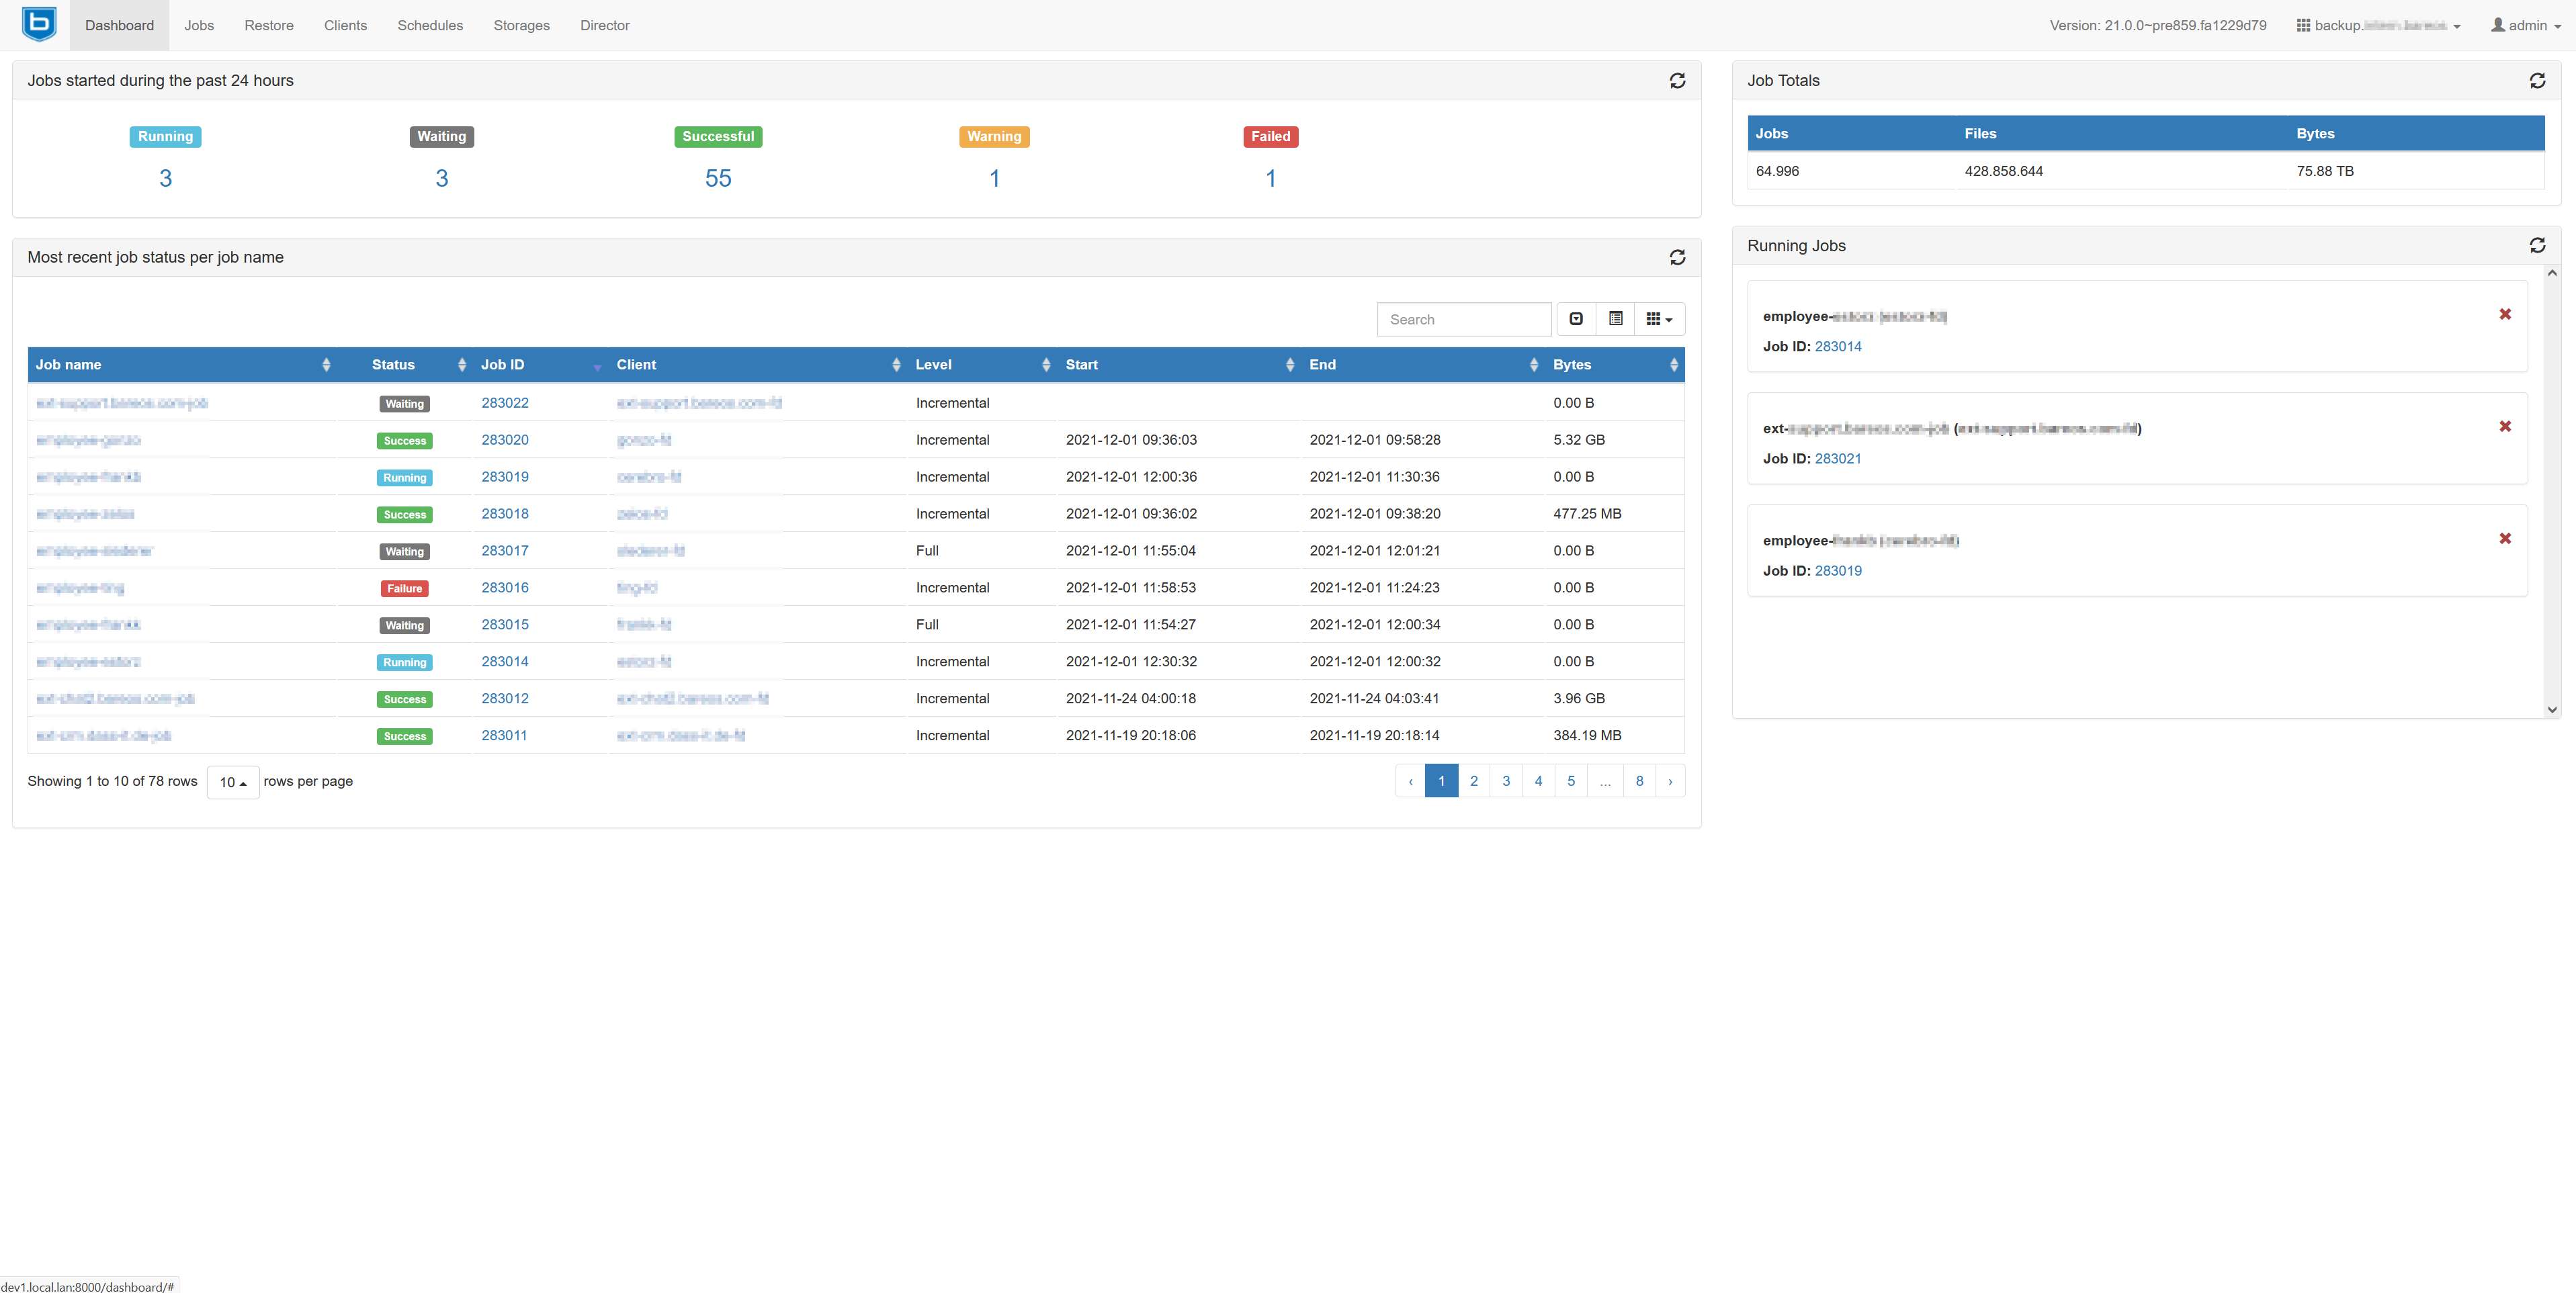
The Dashboard area is your central starting point after you’ve logged in. It gives an overview of Bareos and shows, for example, how many jobs have run in the last 24 hours and if everything went smoothly. If something goes wrong, such as a failed job or a warning, you can spot it immediately. You can search the list by job name, status, job ID, or client name. The right-most column shows useful statistics such as the total number of jobs, files backed up, their size, and currently running backups.
Jobs
The list shows all backup and restore jobs. At the top, you can use the slider to make the list longer or shorter. Basically, you can set the list to show jobs from the current time to x days, weeks or years in the past.
In addition, the first tab (Show) offers search and filter options. You can filter by job or client name, by type (backup or restore), by level (full, incremental, etc.), by start and end time or status.
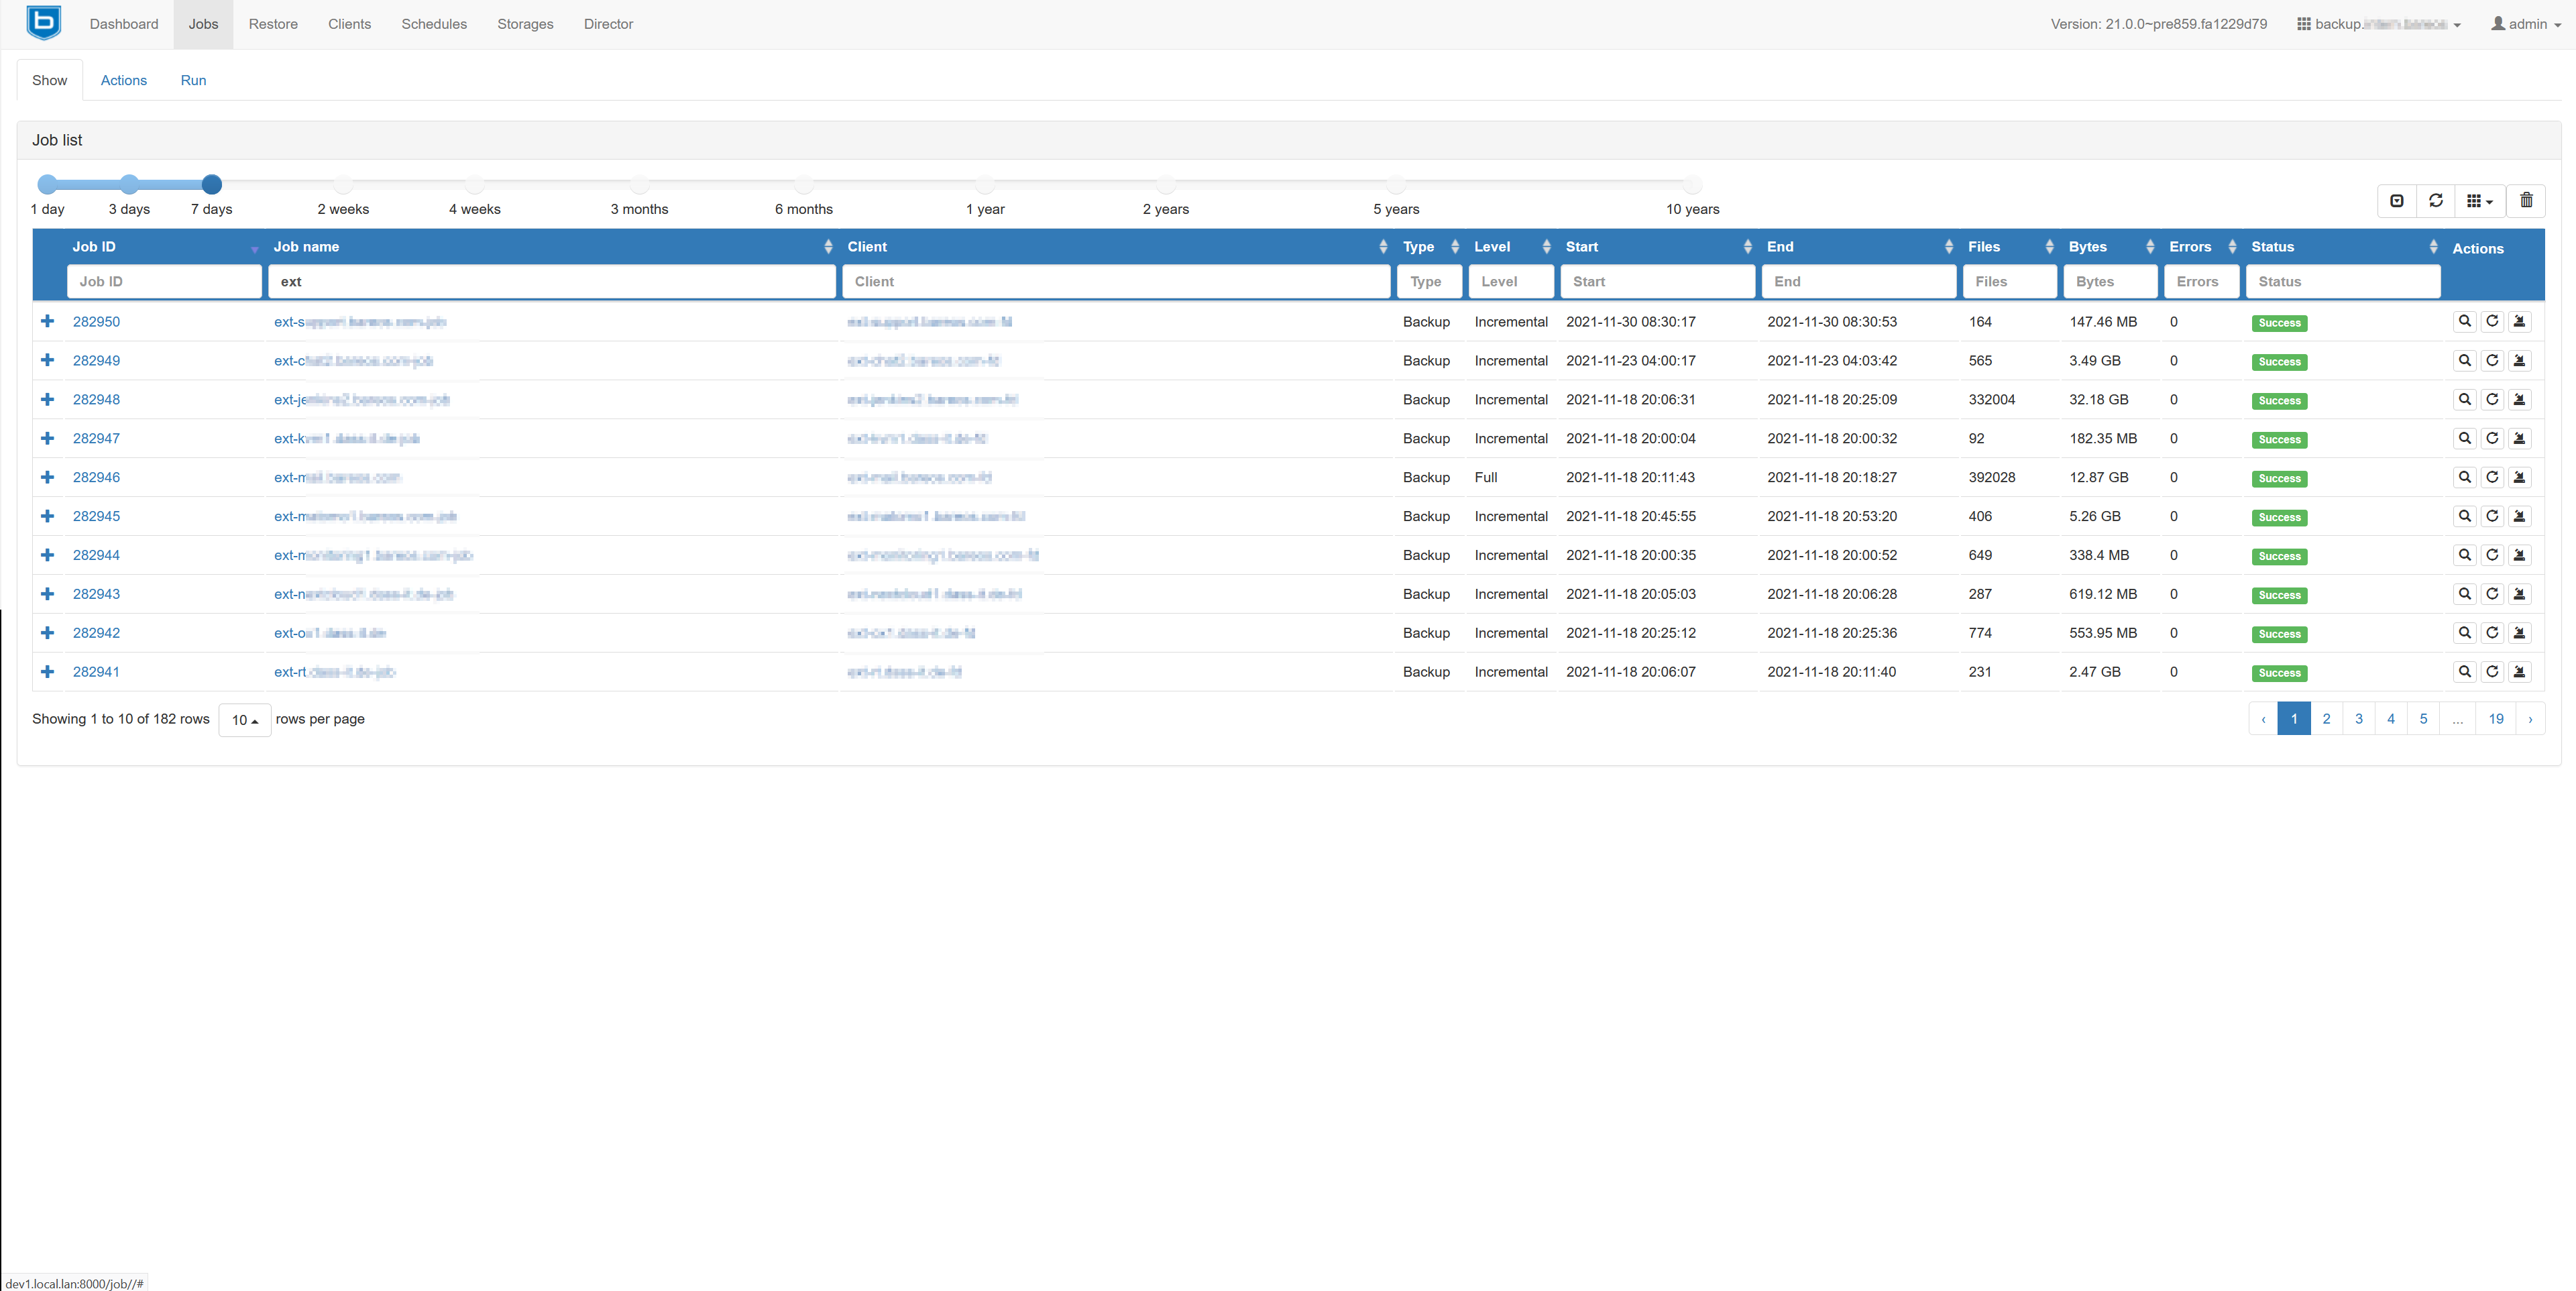
For example, if you want an overview of all failed jobs in the last three days, you can use the Status field to filter the list. As a result, you’ll see all failed jobs. Here you can simply click on the respective job ID to examine the situation in more depth.
The WebUI displays the same job report that bconsole shows. Unlike bconsole, the graphical interface supports highlighting and draws attention to key words like Error, errors, ERR (red color), and Warning (yellow). Therefore it’s a lot easier and quicker to spot messages like Fatal error: No Job status returned from FD or ERR=No route to host.
Tip: The job list as well as the detailed job view contains an icon under Actions which offers to rerun a backup job. This is a great shortcut: you can restart a backup job with just one click and Bareos will start the job under the same conditions.
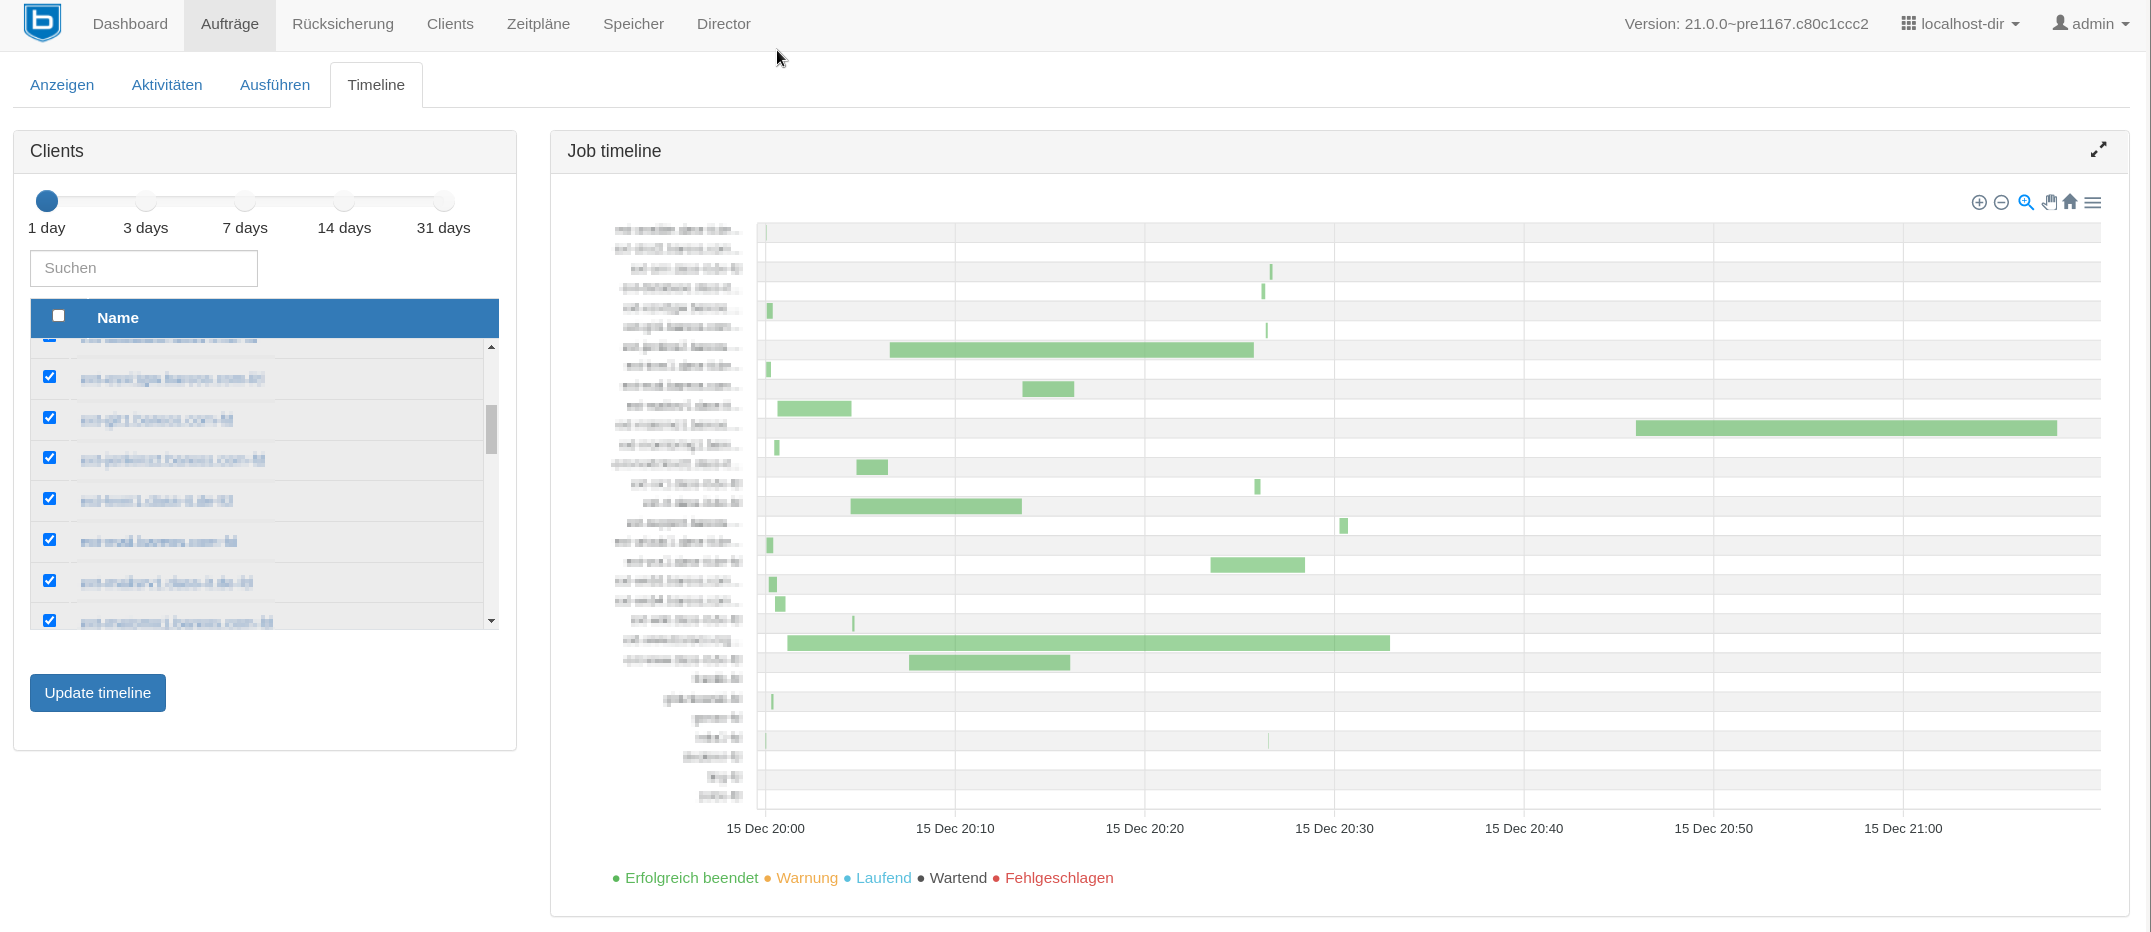
Bareos 21 offers a new Timeline tab, which displays selected jobs in a timeline. This way you can spot immediately running, finished, or failed jobs as well as parallel running tasks. The WebUI uses colors to indicate successfully finished, running or failed jobs. You can set the number of days and file daemons, and you can also zoom in and out of the timeline and switch the view to full screen mode. Especially with larger installations, the new feature helps to get an overview. Admins can spot gaps in the schedule or notice if there are many jobs running at the same time. Finally, it’s easy to identify which jobs are running the longest.
Restore
In this WebUI module you can restore multiple files and specific file versions. Imagine a co-worker walking into your office, saying: “I accidentally deleted this file…” As Bareos admin you can relax and simply ask for the exact day and time, open the WebUI, and go to Restore / Restore specific file version.

Note: The Restore module uses BVFS (Bareos Virtual File System) to enable browsing and selecting files in the WebUI. As soon as you open the module and choose a client, Bareos checks if the BVFS cache is up to date for the corresponding jobs. If not, Bareos refreshes the cache, which may take some time, especially the first time. Our documentation shows how to reduce the waiting time.
After you’ve selected the client and the file from the directory tree, the right-hand column shows all available versions, including time stamps (Last modification), size and checksum. After you’ve clicked the Restore button, Bareos asks for your consent (dialog Confirm restore job) and then restores the file.
It’s very useful that the WebUI displays the Director messages right after that in a new window. With just one click you can jump straight to the job list and watch the status as well as a detailed status report.
Clients
This module shows all connected File Daemons, their operating systems, and Bareos versions. You can temporarily disable or re-enable a client using the icons under Actions.
Please note: These changes last only until the Bareos Director is reloaded. To make them permanent, edit the corresponding configuration file.
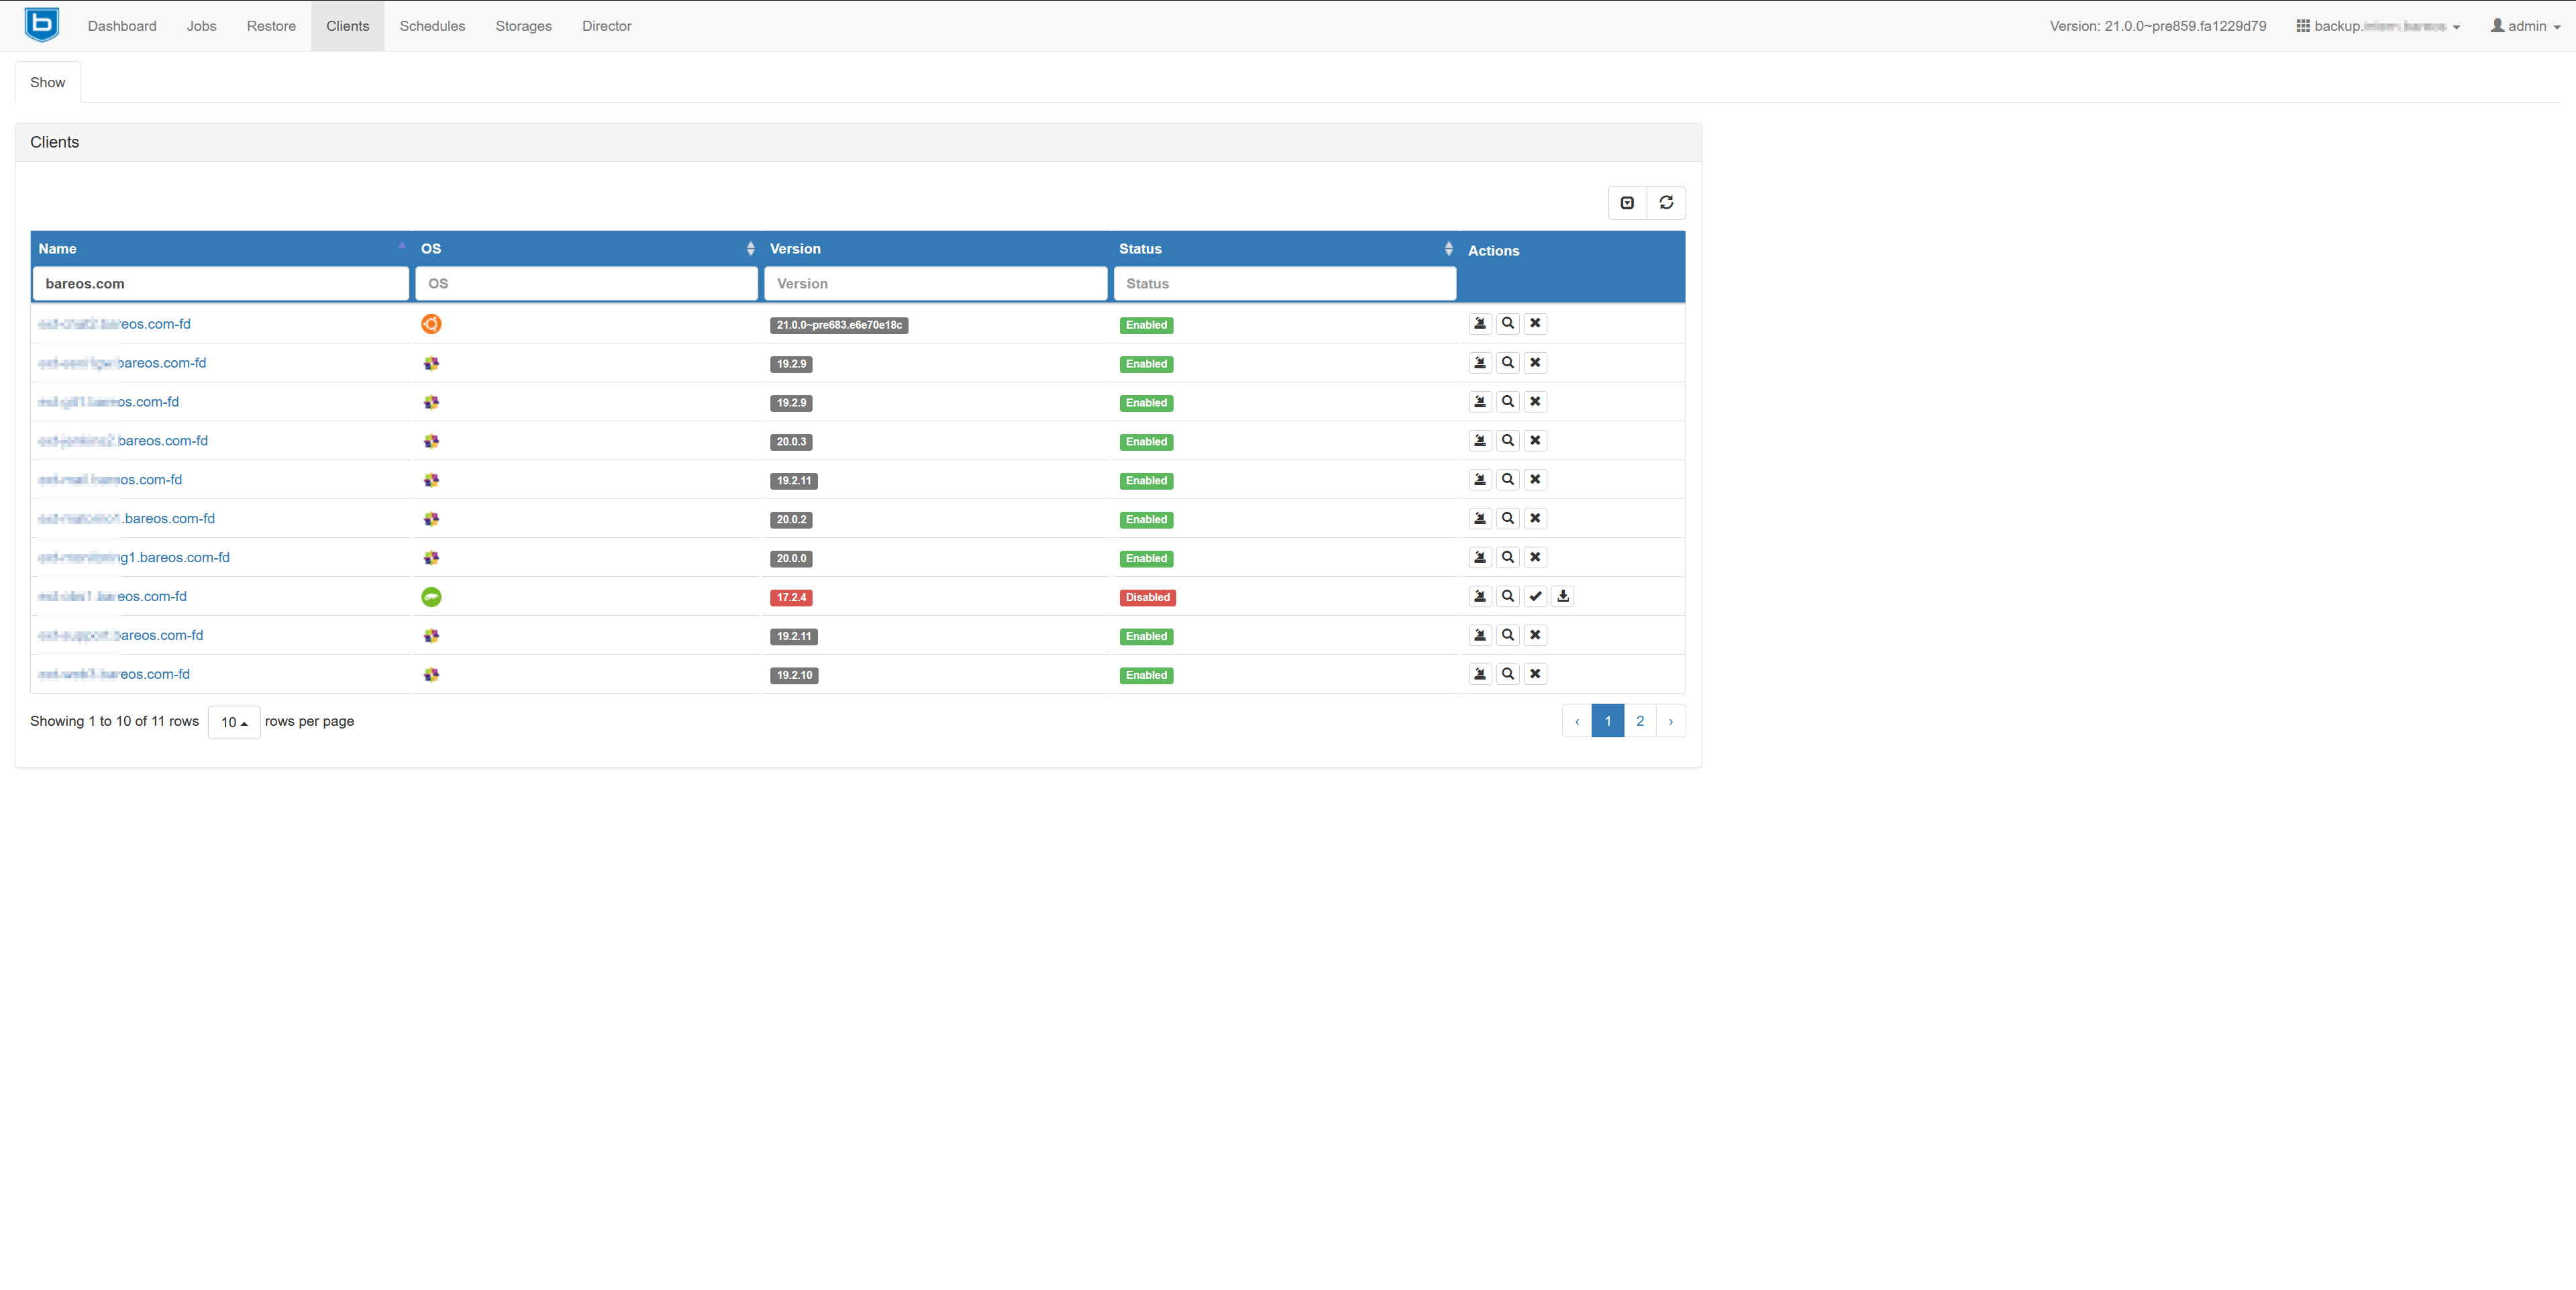
The icon with the magnifying glass starts a status query on the client and displays the same messages as the bconsole command status client. The leftmost icon in the Actions section opens the Restore module. In this case the File Daemon with all available backups is already preselected.
Schedules
Open this module to get a list of all backup schedules, including a sort and filter function. Again, the symbol with the little cross in the Actions temporarily switches schedules off and on again. The Overview tab shows your current configuration. To change that, open the respective files in a text editor.
The tab Scheduler status shows a preview for the next 7 days. By the way, that’s the usual bconsole output which the Bareos WebUI queries and displays.
Storages
The three tabs Devices, Pools, and Volumes give you an overview of the connected storage targets. For example, you can query the status of devices, which is particularly convenient when it comes to tape libraries. This module also offers easy access to exporting tapes that are no longer needed and to importing new tapes. In this case the WebUI also assists you in labelling the new tapes and assigning them to a pool.
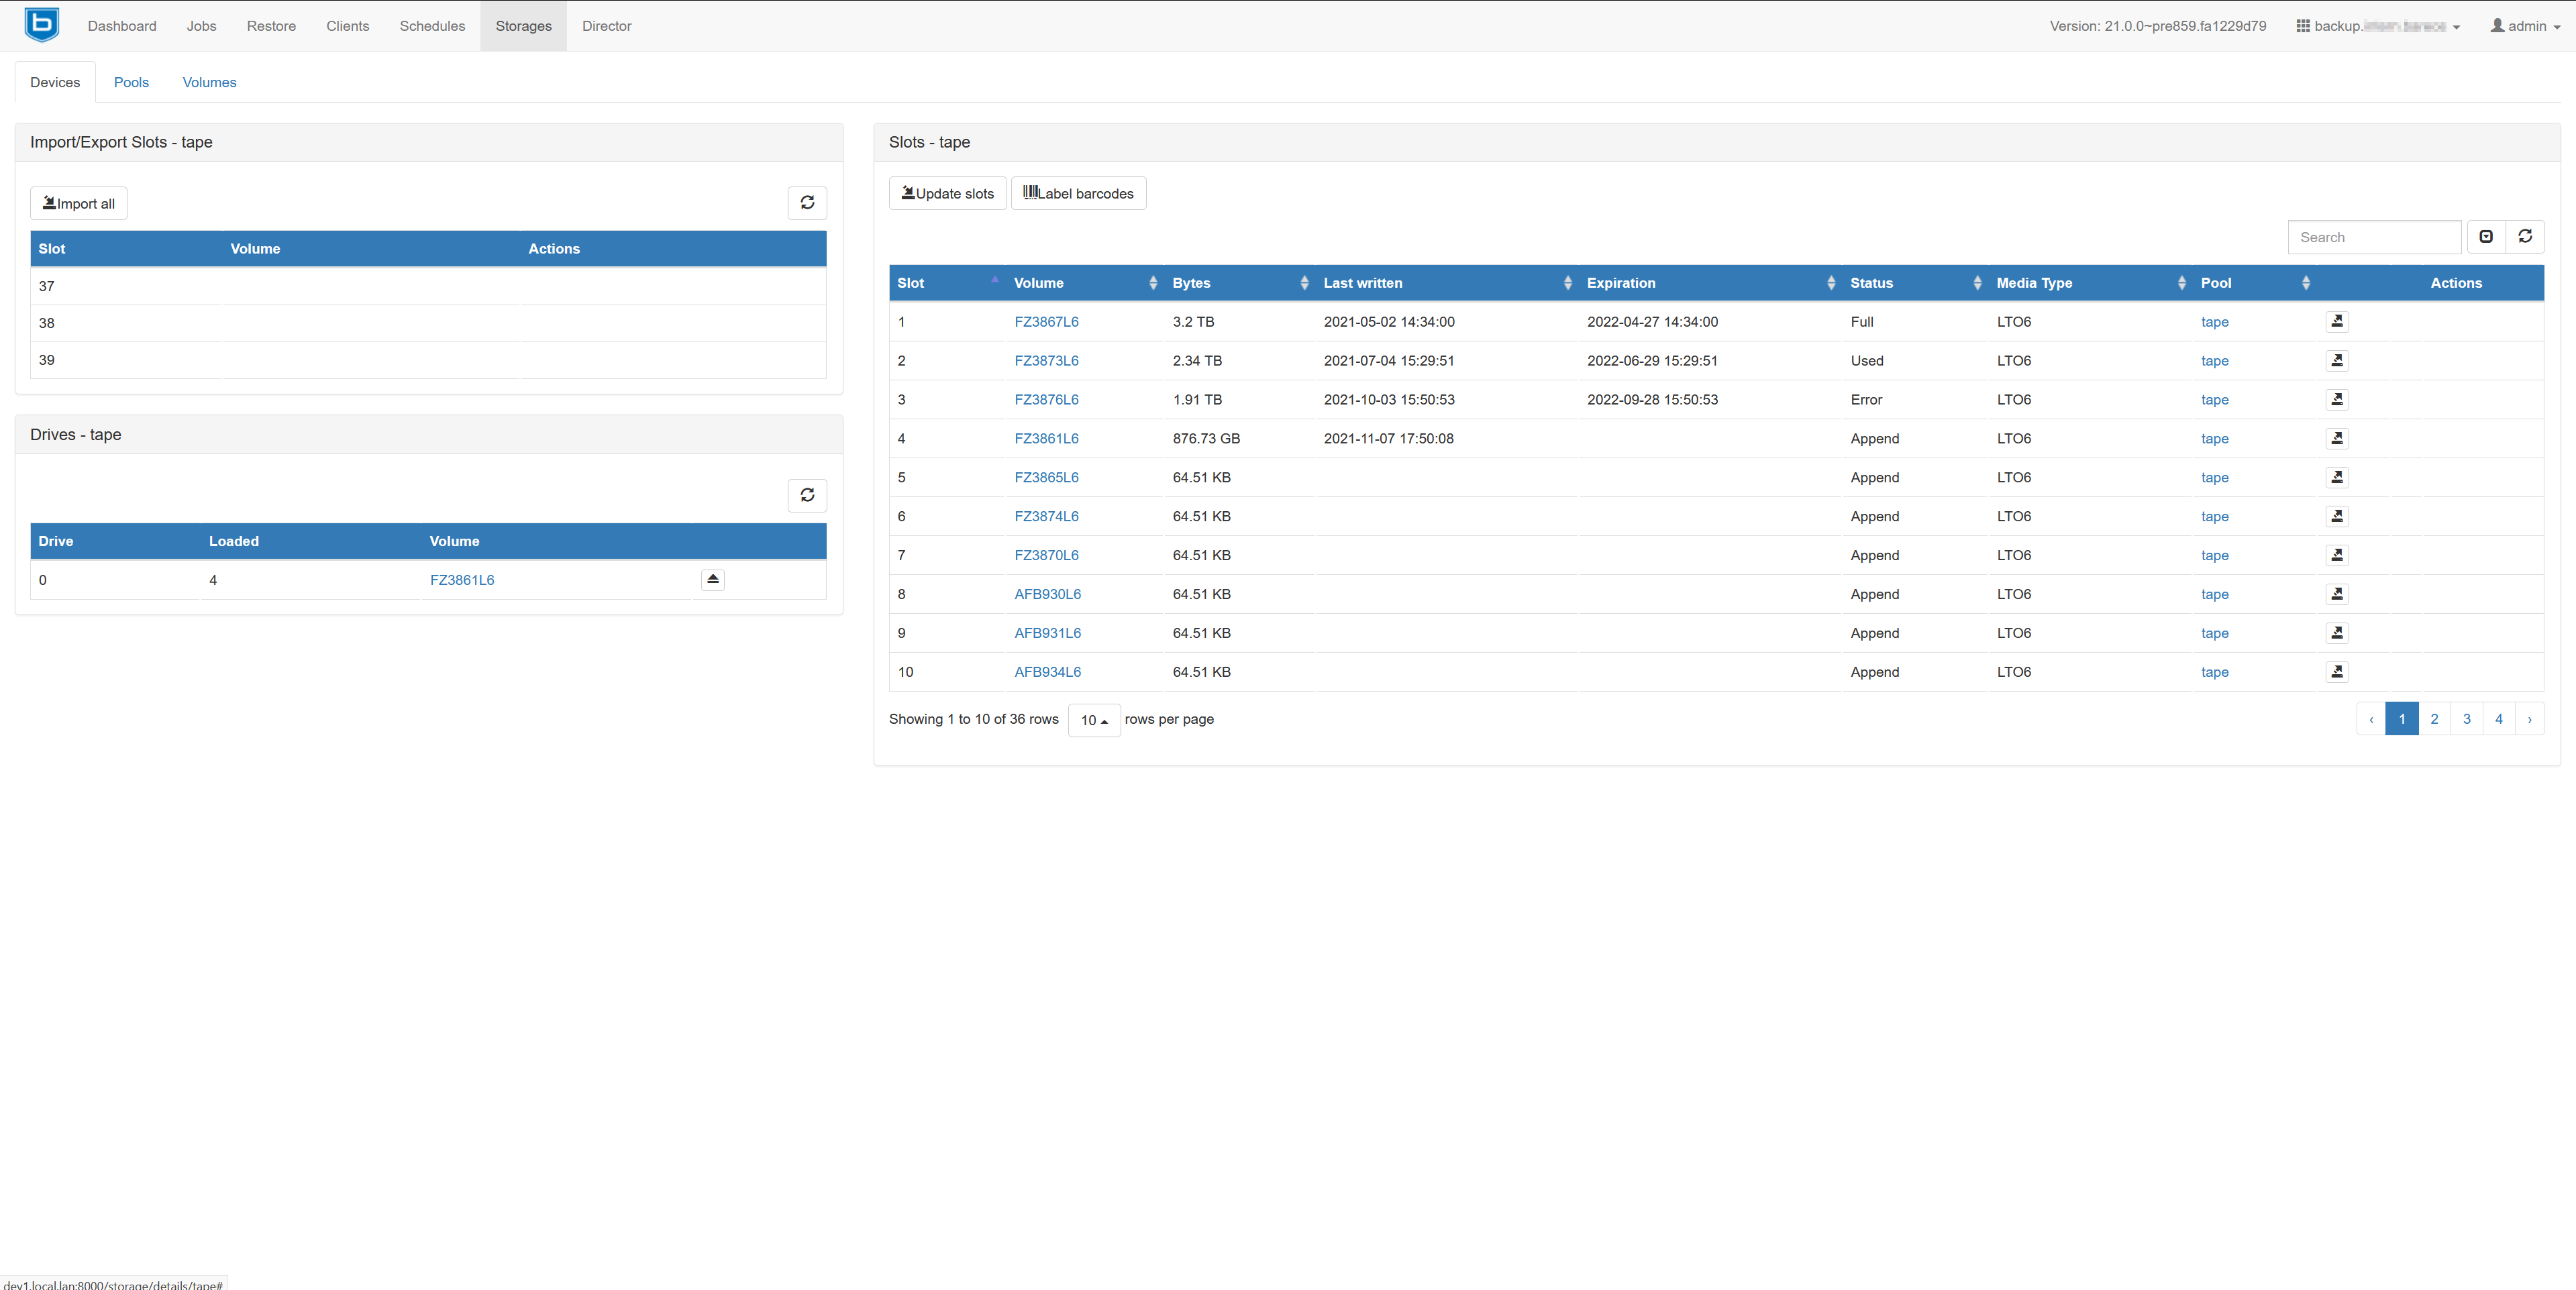
Like I said before, the WebUI links a lot of features, so working in this interface is quick and easy. The tab Pools not only lists all available pools, it also offers to open them with one click to find out which volumes are assigned. You can also open the detailed volume view by clicking the cross symbol. This will tell you, for example, when data was written first and last. Looking at the tape slots, you will learn which tapes have been recycled, how much space is left on a medium, etc. The WebUI offers another handy shortcut in this module. Click on a job ID of a volume to jump directly to the Jobs module.
Director
Here you can examine the status and read the messages of the Bareos Director. There is only one button which will refresh the view—that’s pretty much it. However, the module is still useful, because you don’t have to switch to bconsole to read the Director’s messages when you’re working in the web browser.
Everything is connected
One of the best features of the WebUI is how well the modules are linked. You don’t have to take notes while switching between views — just click through from one section to the next.
For example, from Volumes you can jump to Jobs, and then straight to Restore. Even re-running a failed job takes just one click.
Reminder: ACLs (Access Control Lists) control what users can see and do in the WebUI. Our first episode explains how to assign profiles and accounts. Stay tuned for the third part of this series, which will cover ACLs in more detail.