Bareos has a graphical tool for communicating with the Bareos Director. The WebUI is multilingual and provides detailed information about backup jobs, clients, FileSets, pools, volumes, and more. It’s also possible to start backup and restore jobs via the web interface. Our new blog series gives an introduction to the Bareos WebUI. In this first episode: installation and configuration.
You can install the WebUI via your distribution’s package manager (bareos-webui package). Apart from a working Bareos environment, the WebUI requires PHP version 5.3.23 or newer; PHP 7.x is recommended. Furthermore, the graphical interface requires the Apache web server with the modules mod-rewrite, mod-php and mod-setenv enabled. On SUSE Linux Enterprise (SLES), you also need the module Web and Scripting.
The bareos-webui package provides a default configuration for Apache (bareos-webui.conf file). During the installation the file is automatically put in the right directory (/etc/apache2/conf.d/, /etc/httpd/conf.d/, /etc/apache2/conf-available/, etc.) depending on the distribution. The post-installation routine also sets up the necessary Apache modules. After the installation is done, please restart the web server.
Tip: If you prefer to use Nginx web server instead of Apache, please have a look at our manual. It provides a configuration file which you can use as an example.
You can install the WebUI on the machine which is running the Bareos Director or on a different host—that’s up to you. If possible, Bareos Director and WebUI should be the same version.
If you are using SELinux on the machine, you also have to adjust the rules to grant access to the web server:
setsebool -P httpd_can_network_connect onThe -P option makes the change permanent, which means it will survive a reboot of the machine. Afterwards, restart the web server.
Create a User Account for the Bareos WebUI
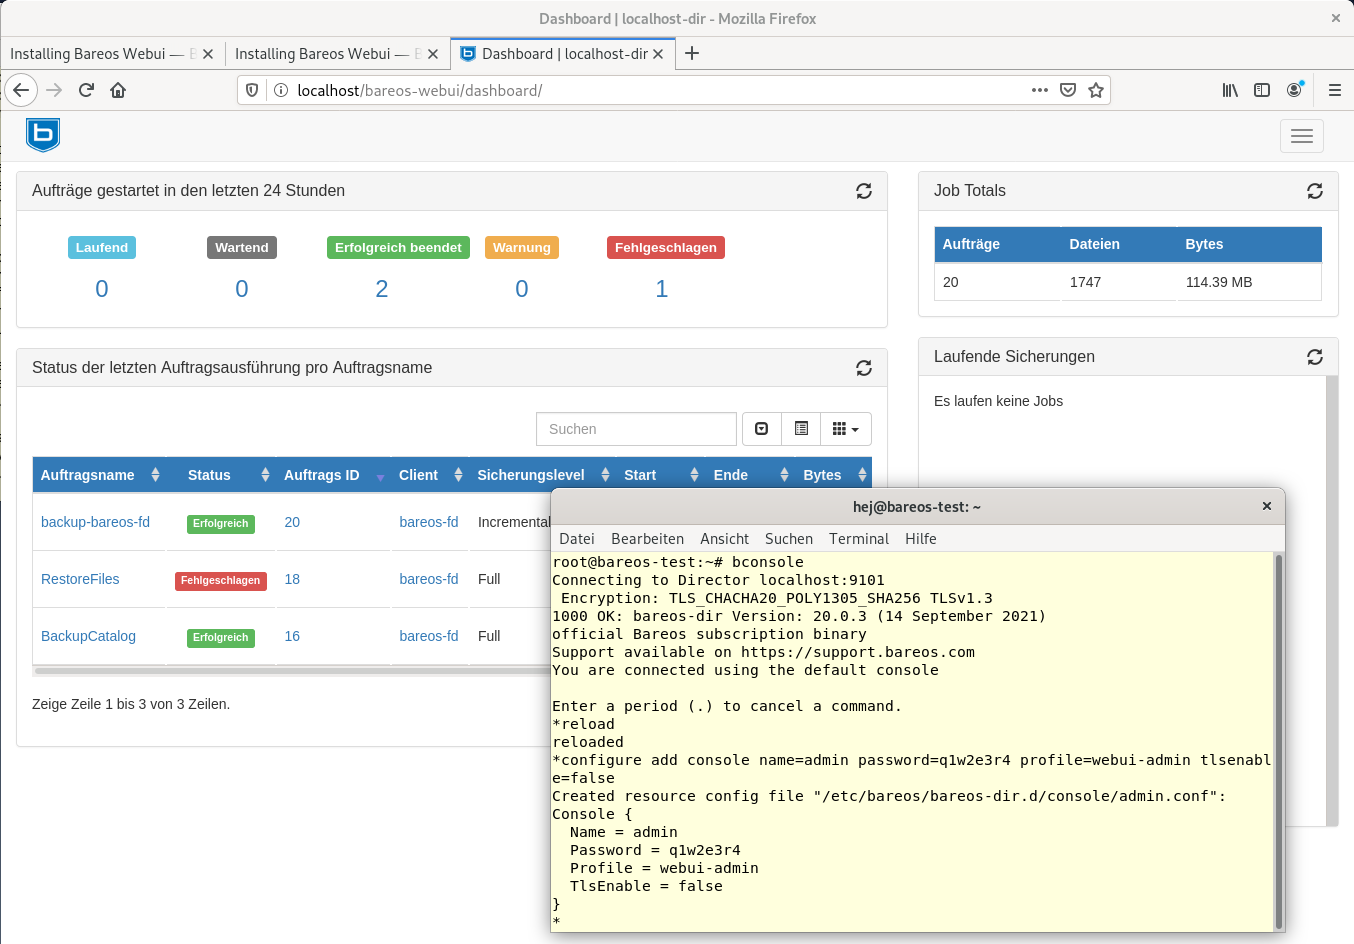
The WebUI doesn’t come with its own user management, so there is no default login. Instead all user accounts for access to the graphical interface are handled by the Bareos Director. Therefore you have to create a Console resource on the Director for each account. The easiest way to set this up is using bconsole. Define a user name (here: admin), a password (q1w2e3r4 in our example), and choose a profile (webui-admin, file /etc/bareos/bareos-dir.d/profile/webui-admin.conf, see section “Profiles for the Bareos WebUI”):
*reload
reloaded
*configure add console name=admin password=q1w2e3r4 profile=webui-admin tlsenable=false
To be on the safe side, execute the reload command before creating the account. The WebUI package supplies some profiles, and the Bareos Director only knows about them after a restart or after reloading its configuration.
Once the account has been created, you can log into the WebUI. Open the URL http://<HOST>/bareos-webui in your web browser and replace <HOST> with the name of the machine or IP address running the WebUI (here: localhost).
By the way: the configuration file admin.conf is stored in the directory /etc/bareos/bareos-dir.d/console. In order to change the login credentials and change the password, for example, you can simply edit the file in your favorite text editor.
Bareos WebUI: First Steps
After you’ve logged in, you enter the dashboard. It shows an overview of all running, waiting, successful and failed jobs. At the same time, the dashboard offers quick access to the most recently executed backup jobs and the associated clients. The dashboard also shows the total number of jobs run, the files backed up, and the amount of data.
From the top margin (or the hamburger button if the screen is not wide enough) you can reach the following modules:
- Jobs: overview of run backup jobs including a timeline and search/filter options, lets you examine and run jobs.
- Restore: restore multiple files as well as specific file versions from a certain point in time.
- Clients: shows connected File Daemons, their respective operating system and the Bareos version installed, disable and enable clients temporarily.
- Schedules: shows schedules, with search and filter options.
- Storages: connected devices, pools, and volumes.
- Director: displays the Bareos Director’s status and messages.
We’ll go into more detail in our next episode which will also show some practical examples for using the WebUI’s modules. In this article we’ll continue with the configuration.
Tip: The Bareos WebUI works with several links which allows you to create your own individual workflows. For example, almost everywhere you’ll see links for the jobs. As a result, clicking a job ID opens the detailed view of the corresponding job. On top of that, the icons under Actions offer to quickly restore or rerun a backup job.
Profiles for the Bareos WebUI
It’s no problem to set up different accounts with different permissions for the WebUI. Every account has its own Console resource, as shown above. Access rights are being handled by the profiles. All available profiles are stored in the directory /etc/bareos/bareos-dir.d/profile. Apart from the profile webui-admin.conf which is used for the admin account, Bareos ships with operator.conf (identical to webui-admin.conf, intended for bconsole users) and webui-readonly.conf (read-only access).
To create a new account with read-only access, you enter the following command in bconsole:
*configure add console name=hej password=topsecret profile=webui-readonly tlsenable=falseAfterwards the user hej can log in with the password topsecret.
The account with read-only access can’t (re)run jobs or restore backups, etc. All buttons and icons are visible, but after clicking them the WebUI you’ll see an error message Access denied.
By the way, in our next article we’ll take a closer look at the single modules, showing examples for using the graphical interface of our backup software. Finally, episode 3 of this series will talk about tips and tricks for ACLs (Access Control Lists).